Keeping your semi-truck in top condition is crucial for safety, performance, and longevity. One of the most important maintenance tasks for every truck driver and fleet operator is checking the coolant level. Neglecting this simple routine can lead to engine overheating, costly repairs, or even complete engine failure.
This post will tell you everything you need to know about checking the coolant in your semi-truck, from understanding the cooling system to step-by-step instructions and troubleshooting tips.
Why is Coolant Important for Your Semi Truck?
Coolant, also known as antifreeze, does more than just prevent your engine from freezing in cold weather. It plays several critical roles:
- Regulates Engine Temperature: Keeps the engine within a safe operating temperature range.
- Prevents Overheating: Stops heat build-up that can warp engine parts.
- Protects Against Corrosion: Contains inhibitors to prevent rust in the radiator and engine.
- Lubricates Components: Helps protect water pumps and other moving parts.
For a semi truck, which often hauls heavy loads over long distances, a functioning cooling system is non-negotiable. Missing or low coolant can result in overheating, head gasket failure, and catastrophic engine damage, costing thousands of dollars in repairs.
Understanding the Cooling System
Before checking the coolant, it helps to understand how a semi truck’s cooling system works.
Components of a Semi Truck Cooling System
- Radiator: The main component where coolant releases heat.
- Water Pump: Circulates coolant throughout the engine and radiator.
- Thermostat: Controls when coolant flows to maintain optimal temperature.
- Coolant Reservoir (Overflow Tank): Holds extra coolant for expansion and contraction.
- Hoses and Clamps: Carry coolant between components.
- Fans: Help dissipate heat from the radiator when the truck is stationary or moving slowly.
Knowing these components helps you locate where to check coolant and identify possible leaks.
Types of Coolant Used in Semi Trucks
Semi trucks typically use heavy-duty coolant formulations designed for diesel engines. Using the right type is crucial:
- Inorganic Additive Technology (IAT): Traditional coolant for older trucks.
- Organic Acid Technology (OAT): Modern, long-life coolant with better corrosion protection.
- Hybrid Organic Acid Technology (HOAT): Combines benefits of IAT and OAT, often recommended for mixed fleets.
Tip: Always check your truck manufacturer’s manual to ensure the correct coolant type. Mixing incompatible coolants can cause chemical reactions that damage the system.
How Often You Should Check Coolant?
Regular checks prevent issues before they become serious. Recommended intervals:
- Daily / Pre-trip Checks: Quick visual inspection of coolant level and leaks.
- Weekly Checks: More detailed inspection, including hoses and radiator.
- Every 3-6 Months: Complete system flush and refill (or as per manufacturer’s guidelines).
For long-haul drivers, a pre-trip inspection is the most practical time to check coolant. Even a slight drop can indicate a leak or other problem that needs attention.
Tools and Safety Gear Needed
Before checking the coolant in your semi truck, gather the following tools and safety gear to ensure a safe and effective inspection:
- Safety Gloves – Protect your hands from hot coolant, chemicals, and sharp components.
- Safety Glasses – Prevent coolant splashes from getting into your eyes.
- Clean Cloth or Rag – Useful for wiping spills, cleaning the reservoir cap, and checking hoses.
- Funnel – Helps pour coolant into the reservoir or radiator without spilling.
- Flashlight – Assists in seeing inside the reservoir or radiator in low-light conditions.
Safety Tip: Never remove the radiator cap while the engine is hot. Coolant under pressure can spray out and cause serious burns. Always wait until the engine has cooled completely, typically 30–60 minutes after driving.
Step-by-Step Guide: Checking Coolant Level in a Semi Truck
To check coolant in a semi truck, follow these steps: #Step 1: Park Safely, #Step 2: Locate the Coolant Reservoir, #Step 3: Check the Level Markings, #Step 4: Inspect the Coolant Condition, #Step 5: Check the Radiator (Optional), #Step 6: Add Coolant if Needed, #Step 7: Secure Everything.
Checking your semi truck’s coolant is a simple but essential maintenance task that can prevent engine overheating and costly repairs. Follow this detailed step-by-step guide to do it safely and effectively:
#Step 1: Park Safely
Before inspecting the coolant, make sure your truck is parked on a level surface. This ensures accurate readings.
- Turn off the engine completely.
- Let the engine cool for at least 30–60 minutes. This is crucial because the coolant system is under pressure when hot, and removing caps prematurely can cause burns from hot coolant or steam.
Tip: Use wheel chocks if parked on a slope for added safety.
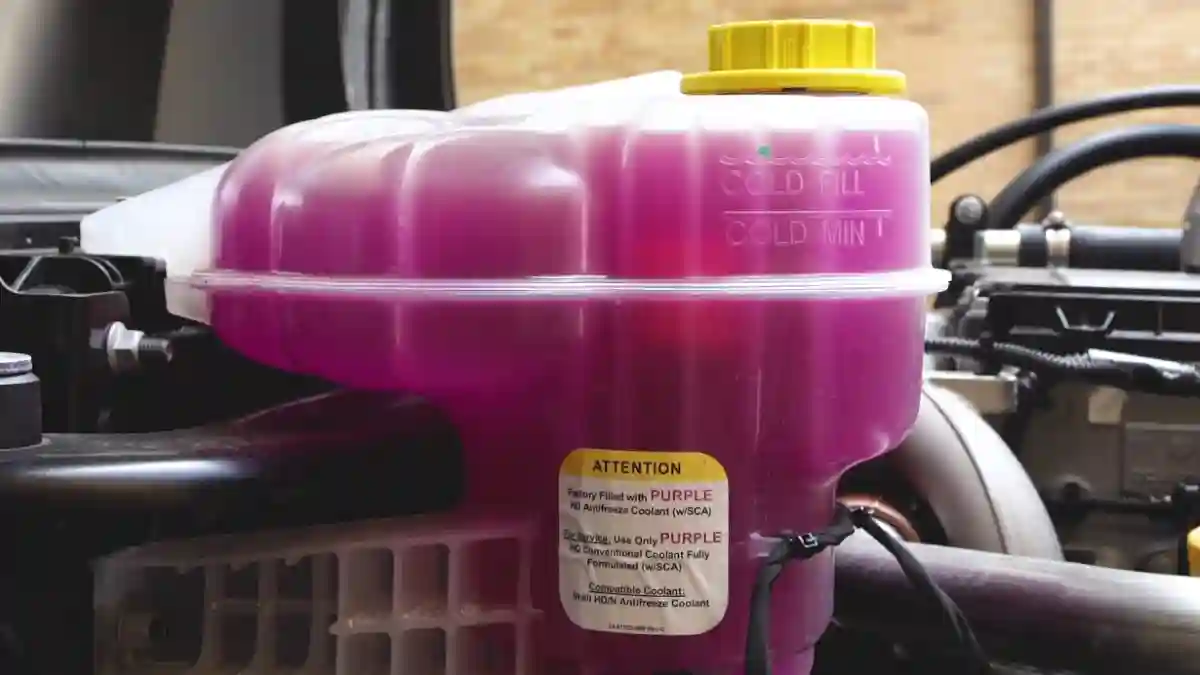
#Step 2: Locate the Coolant Reservoir
Most semi trucks have a transparent plastic reservoir near the radiator, which allows you to see the coolant level without opening the radiator.
- Some older or larger trucks may require checking directly in the radiator.
- Look for a cap labeled “Coolant” or “Engine Coolant”.
Knowing the reservoir’s location makes regular checks faster and safer.
#Step 3: Check the Level Markings
- Most reservoirs have “MIN” and “MAX” markings.
- The coolant should always be between these two marks.
- If the level is below the MIN mark, it means the system is losing coolant, possibly due to a leak or evaporation.
Tip: Never fill above the MAX mark, as coolant expands when hot, and overfilling can create excess pressure in the system.
#Step 4: Inspect the Coolant Condition
Checking the condition of the coolant is just as important as checking the level.
- Good coolant is usually green, orange, or pink, depending on the type used.
- Cloudy, rusty, or sludgy coolant indicates contamination, corrosion, or old fluid that may need replacement.
- Pay attention to any floating debris, which could indicate internal rust or gasket issues.
Tip: Proper coolant not only cools the engine but also protects against corrosion and lubricates moving parts like the water pump.
#Step 5: Check the Radiator (Optional)
If the reservoir is low, you may need to check the radiator directly—but only when the engine is cold.
- Slowly remove the radiator cap to relieve any remaining pressure.
- Look for coolant at the top of the radiator neck.
- If the radiator is empty or very low, the truck may have a serious leak or internal issue that needs attention.
Warning: Never attempt this with a hot engine—hot coolant can spray out and cause serious burns.
#Step 6: Add Coolant if Needed
- Use a 50/50 mix of coolant and distilled water, unless the manufacturer recommends a different ratio.
- Pour slowly to avoid creating air pockets, which can reduce cooling efficiency.
- Stop at the MAX mark; overfilling can damage hoses or the radiator.
Tip: Always use the coolant type specified in the truck manual, as using the wrong type can damage the engine or reduce corrosion protection.
#Step 7: Secure Everything
- Replace the radiator cap or reservoir cap securely.
- Wipe up any spilled coolant immediately—antifreeze is toxic and slippery.
- Double-check all hoses and clamps for leaks while finishing the check.
Tip: Keep a small towel or rag in the cab for quick cleanup, and consider carrying extra coolant for long trips.
Driver’s Note:- Performing this check before every long haul can prevent overheating, engine damage, and expensive repairs. Even a small drop in coolant level can be a warning sign of leaks or system issues.
Common Mistakes to Avoid When Checking Coolant
Maintaining the coolant system in a semi truck may seem simple, but many drivers make common mistakes that can lead to engine damage, leaks, or unsafe driving conditions. Understanding these pitfalls can help you avoid costly repairs and keep your truck running reliably.
#1. Checking Coolant When Hot
One of the most dangerous mistakes is checking the coolant while the engine is still hot.
- Why it’s Risky: Coolant and steam are under high pressure when hot. Removing the radiator or reservoir cap too soon can cause hot liquid to spray out, resulting in serious burns.
- Proper Approach: Always allow the engine to cool for at least 30–60 minutes before opening any caps.
- Tip: If you must check during a short stop, at least ensure the engine temperature gauge is in the cold zone, and approach the cap carefully.
#2. Using the Wrong Coolant Type
Not all coolants are created equal, and using the wrong type can damage your truck’s cooling system.
- Why it matters: Coolants have different chemical compositions (IAT, OAT, HOAT) designed for specific engines. Mixing incompatible types can cause chemical reactions, sludge formation, or corrosion inside the engine and radiator.
- Proper approach: Always check the truck manufacturer’s manual for the recommended coolant type and use it exclusively.
- Tip: For fleet trucks with multiple vehicles, labeling coolant containers prevents accidental mixing.
#3. Overfilling the Coolant
Overfilling may seem harmless, but it can create serious problems.
- Why it’s Risky: Coolant expands as it heats up. Overfilling the reservoir or radiator can create excess pressure, which may cause burst hoses, cracked reservoirs, or leaks.
- Proper Approach: Fill coolant only up to the MAX mark on the reservoir. If topping off the radiator directly, stop when the coolant reaches the top of the radiator neck.
#4. Ignoring Discoloration or Debris
Coolant should be clean and bright. Ignoring its condition is a mistake many drivers make.
- Warning signs: Cloudy, rusty, or sludgy coolant, or debris floating in the fluid, often indicates corrosion, contamination, or failing head gaskets.
- Consequences: Contaminated coolant reduces heat transfer, increases wear on the water pump, and can clog passages inside the radiator.
- Proper Approach: Inspect coolant visually during every check. If it appears discolored or dirty, flush the system and replace with fresh coolant.
#5. Not Inspecting Hoses and Clamps
Hoses and clamps are often the weakest points in a cooling system, but drivers sometimes overlook them.
- Why it’s Important: Worn hoses can leak, crack, or detach under pressure. Loose clamps allow coolant to escape at connection points.
- Signs of Wear: Soft, bulging, cracked, or brittle hoses; coolant residue near clamps; or dripping under the truck.
- Proper Approach: During every coolant check, visually inspect all hoses and clamps. Replace any that show signs of wear to prevent leaks and engine overheating.
Signs of Coolant Problems
Watch for these warning signs that coolant may be low or leaking:
- Engine temperature gauge rising quickly.
- Steam or sweet-smelling vapor from the engine.
- Puddles or drips under the truck.
- White smoke from the exhaust (possible head gasket issue).
- Heater not producing hot air (indicates low coolant).
Troubleshooting Low Coolant
If you notice low coolant, follow these steps:
- Inspect for Visible Leaks – Check hoses, the radiator, water pump, and the reservoir for cracks, drips, or wet spots that indicate coolant escaping.
Even small leaks can lead to significant coolant loss over time if not addressed. - Check the Radiator Cap – A worn or damaged radiator cap can fail to maintain pressure, allowing coolant to escape or boil over.
Replace the cap if it shows cracks, corrosion, or a loose fit to maintain system integrity. - Look for Internal Leaks – Internal leaks, like oil mixing with coolant or white smoke from the exhaust, may indicate a blown head gasket.
- These issues prevent proper cooling and require immediate attention to avoid engine damage.
- Top Off Temporarily – If coolant is low, carefully add the correct 50/50 mix of coolant and water to reach a safe level. This is a temporary measure—do not rely on it as a permanent fix.
- Schedule Professional Repair – Even after topping off, persistent low coolant or leaks require a qualified mechanic for inspection and repair. Avoid long trips until the problem is fully resolved to prevent overheating or engine failure.
Preventive Maintenance Tips for Your Semi Truck Coolant System
Preventing coolant problems is always easier, safer, and cheaper than fixing them after they occur. Regular attention to your cooling system ensures your engine stays reliable, efficient, and protected from costly damage.
- Regularly Inspect Hoses, Clamps, and Radiator – Check hoses for cracks, bulges, or soft spots, and ensure clamps are tight and secure. Also inspect the radiator for leaks, corrosion, or damaged fins, as these are common sources of coolant loss.
- Flush and Refill the Coolant System – Over time, coolant degrades and loses its protective properties. Follow the manufacturer’s recommended schedule to flush old coolant and refill with fresh fluid, preventing corrosion and buildup.
- Use Distilled Water When Mixing Coolant – Tap water contains minerals that can deposit inside the engine and radiator, reducing cooling efficiency. Always mix coolant with distilled water to keep the system clean and prevent clogs.
- Monitor Engine Temperature on Every Trip – Keep an eye on the temperature gauge to detect early signs of overheating. Unusual spikes or fluctuations may indicate low coolant, leaks, or a failing cooling component.
- Check Belts and Water Pump – The water pump circulates coolant through the engine, and belts drive the pump. Inspect belts for wear, cracks, or looseness, and ensure the pump is functioning properly to maintain steady coolant flow.
FAQ’s
Here are some frequently asked questions to help you with checking the coolant level in your semi truck:
Q. How do I check the coolant level in my semi truck?
To check the coolant level in a semi truck, wait for the engine to cool, locate the coolant reservoir, and ensure the fluid is between the “MIN” and “MAX” marks. Never open the radiator cap when the engine is hot.
Q. How often should I inspect coolant in a semi truck?
Check the coolant level daily before trips or during routine maintenance to prevent overheating and engine damage.
Q. What type of coolant is best for a semi truck?
Most semi trucks use Extended Life Coolant (ELC), often in red, orange, or purple. Always refer to the owner’s manual for the correct type.
Q. Can low coolant cause my semi truck engine to overheat?
Yes. Low coolant can cause engine overheating, potential head gasket failure, and long-term engine damage. Always top up coolant as needed.
Q. Is it safe to drive a semi truck with low coolant?
No. Driving with low coolant can seriously damage the engine. Refill coolant before driving to avoid costly repairs.
Q. How can I tell if my semi truck has a coolant leak?
Signs include:
- Puddles of coolant under the truck
- Sweet smell from the engine
- Rapid drop in coolant level
- Overheating warning lights
- Wet hoses or radiator area
Q. Should I check coolant when the engine is hot or cold?
Always check coolant when the engine is cold. Opening the reservoir or radiator cap when hot can cause burns or fluid spray.
Q. Why is my semi truck overheating even though the coolant level is full?
Possible reasons:
- Faulty thermostat
- Clogged radiator
- Broken water pump
- Air trapped in cooling system
- Coolant leak somewhere else in the system